From photo to finished piece — the complete guide
Everything in one place: how to pick a photo that converts well, how wide to make it, how to read the chart, how to fix colors by hand, and which export format to use. New to fuse beads? Start at step 1 and follow along.
1 Pick a good photo
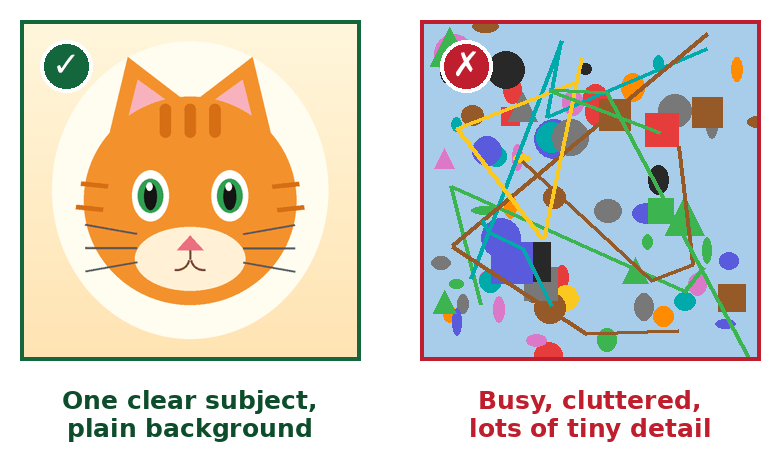
Choose a picture with one clear subject, a plain background and strong contrast. Faces, pets, logos and cartoon art work best. Busy scenes with lots of tiny detail blur together at bead size — if your photo is busy, crop in tight around the subject first.
2 Set the width
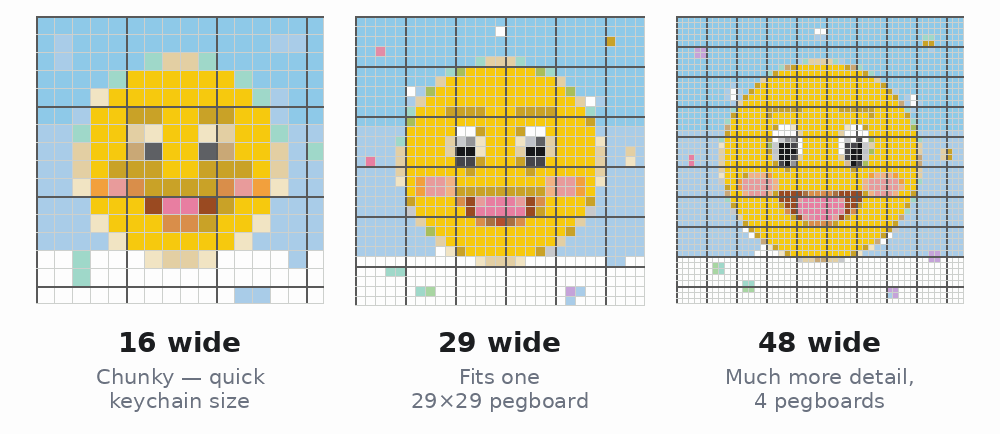
The width is how many beads across your finished piece will be; the height follows your photo automatically. More beads = more detail, but also more beads, more time and more cost. As a guide: keychains 20–30 beads wide; a coaster is one pegboard at exactly 29; desk pieces 40–60; wall pieces 80+. Standard midi beads are 5 mm, so 29 beads ≈ 14.5 cm across.
3 Read the chart
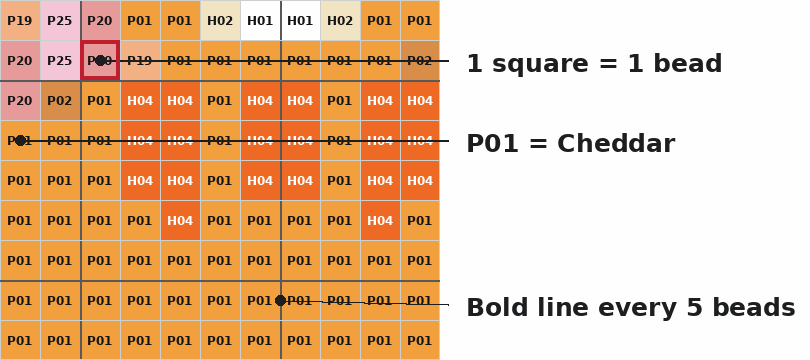
Every square is one bead. The code printed in each cell (like P01) is that bead’s color code — the same code shown in the shopping list. The bold lines every 5 beads let you count in fives instead of one by one. You can switch the grid lines and the codes on or off above your pattern.
4 Buy beads from the list
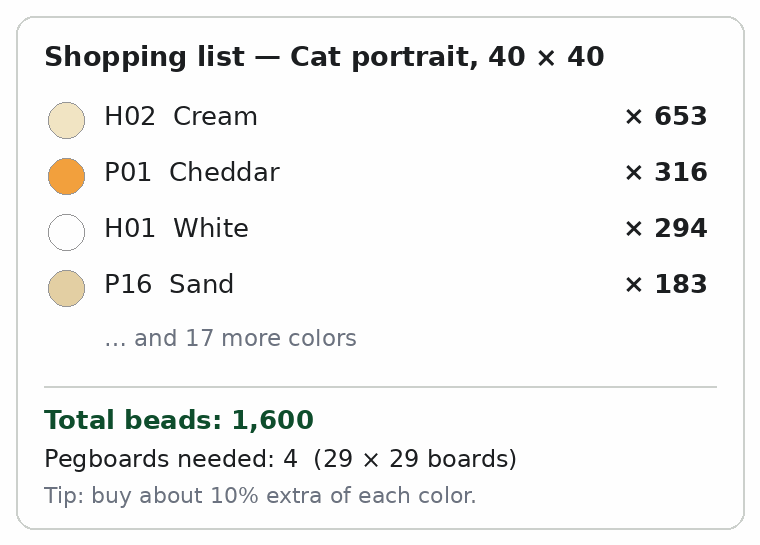
Under your pattern you’ll find the shopping list: every color with its code, name and exact count, the total bead count, and how many standard 29 × 29 pegboards the piece takes. Buy about 10% extra of each color — a few beads always roll away.
5 Download, print & build
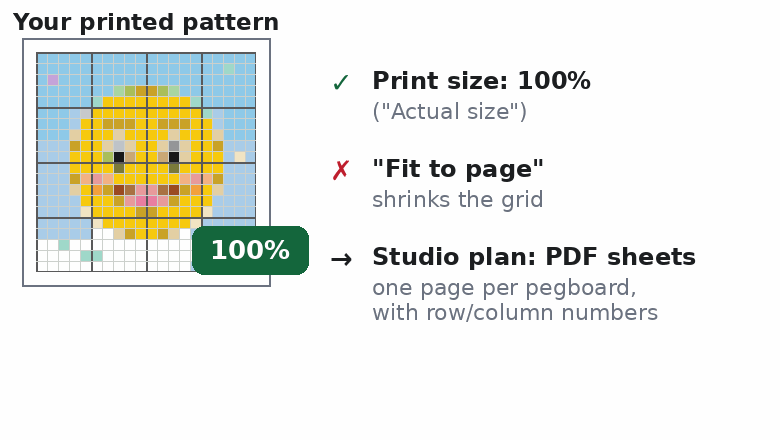
Download the pattern as a PNG and build from your screen, or print it. When printing, choose 100% / “Actual size” — “Fit to page” shrinks the grid so it no longer matches your pegboard. On the Studio plan, PDF board sheets split big patterns into one page per pegboard, with row and column numbers on every page. To finish: cover the piece with parchment (ironing) paper and iron on medium heat, moving in slow circles, until the bead tops melt together. Let it cool flat — a heavy book on top keeps it from curling.
6 Fix colors by hand
Automatic matching is good, but it can’t know that the cat’s eyes must be green. Under your pattern you’ll find the editing palette with every color in your plan. Pick a color, then tap — or drag across — the cells you want to repaint.
The eraser clears a cell back to empty (no bead). Undo — or Ctrl+Z — walks back through your changes, one stroke at a time. The bead list and totals recount themselves after every edit, so what you see is exactly what you need to buy. Editing is free on every plan.
7 Export formats, explained
| Format | Best for | Plans |
|---|---|---|
| PNG chart | Building from the screen, or sharing the chart | All plans (Free carries a small watermark) |
| CSV bead list | A printable shopping list | Pro & Studio |
| XLSX bead list | The shopping list as a spreadsheet — sort, filter, share | Pro & Studio |
| SVG pattern | A scalable chart for design tools and print work | Pro & Studio |
| PDF board sheets | One printed page per pegboard, with row/column coordinates | Studio |
| Batch generation | Converting many photos in one go | Studio |
8 Sizes, boards & printing — the numbers
- Bead size: standard midi beads are 5 mm, so finished width = beads across × 5 mm.
- Pegboards: the standard board is 29 × 29 beads; the tool estimates how many boards a piece takes.
- Widths: up to 48 beads wide on Free, 120 on Pro, 200 on Studio.
- Palette: 64 colors on Free; the full 100-color Perler + Hama + Artkal palette on Pro and Studio.
- Printing: always 100% / Actual size — one printed square must equal one bead.
- Privacy: everything runs in your browser. Photos are never uploaded and there is no account.
Guide FAQ
How many beads and pegboards will I need?
The shopping list under your pattern counts every color exactly, plus the total bead count and how many standard 29 × 29 pegboards the piece takes. For example, the cat pattern above needs 1,600 beads in 21 colors and 4 pegboards. Tip: buy about 10% extra of each color — a few beads always roll away.
Is my photo uploaded to a server?
No. Everything runs locally in your browser — your photo never leaves your device, nothing is stored, and there is no account. Close the tab and it's gone.
What's the difference between Free, Pro and Studio?
Free: patterns up to 48 beads wide, the basic 64-color palette, and PNG exports with a small watermark. Pro ($4.99/mo): up to 120 wide, the full 100-color palette, watermark-free exports and a downloadable CSV bead list. Studio ($9.99/mo): up to 200 wide, printable PDF board sheets, batch generation and a commercial license. See Pricing above for the full comparison.
Why does my downloaded PNG have a watermark?
Free-plan exports carry a small “Made with Bead Pattern Maker” strip along the bottom so people can find the tool. Pro and Studio exports are completely clean.
My printed grid doesn't line up with my pegboard. What went wrong?
Your printer scaled the page. Reprint at 100% / “Actual size” and turn off “Fit to page” — one printed square must equal one bead. Or simply build from the screen, or use Studio's PDF board sheets, which are paginated to match one pegboard per page with row and column numbers.
Can I use this on my phone?
Yes — it works in any modern mobile browser, and you can install it like an app (look for “Add to Home Screen”); after that it even works offline. Your photos stay on your phone, exactly like on a computer.
Do I need an account or sign-up?
No. There is no account and nothing to install — open the page and start. If you upgrade, your license key is stored only on your own device.
Which bead brands do the colors match?
The palette follows standard Perler / Hama color codes — every color carries its code and name (for example H05 Red), so you can buy exactly the beads the chart calls for.
Can I sell pieces I make with these patterns?
Yes on the Studio plan, which includes a commercial license. Free and Pro are for personal projects.
Can I fix a color the tool got wrong?
Yes. Under your pattern, pick any palette color and tap the cells you want to change — or use the eraser to clear a cell back to empty. The shopping list recounts itself after every edit, and Undo steps back through your changes.
Ready to make yours?
Open the tool, drop in a photo, and your first pattern is about a minute away.